Getting Started:
What do I Need to get Started?
You will need:
- To order a SIM card for every device/machine that you would like to communicate with your server.
- If you want private connectivity to your private server (on-premise or cloud), you will need also a Windows computer to act as a server for receiving communications from your connected devices. This computer could be where your IoT project is controlled or could re-route to the control centre for your IoT project
What is the APN Configuration?
In order to use your devices, you must have the right configuration for the APN in the client device.
If you go to the device details page you will find the specific configuration to use, including APN name, user and password, of the device you want to use
If prompted for authentication choose PAP.
Tip: Check your device’s user guide for more information on how to configure your device.
When can I Start Using my Account?
- Once your order has been placed, processing is immediate, and your SIMs will be shipped as soon as possible
- Once received, install the SIM cards into the devices you wish to connect to your network server and set up the APN
- A confirmation email with a link to create a password is sent to the email address provided on the order
- Log in to your account using your email address and newly created password.
General:
What is IoT CONNECT?
An online software service (SaaS) allowing your devices/machines to connect securely to your server/computer using mobile technology.
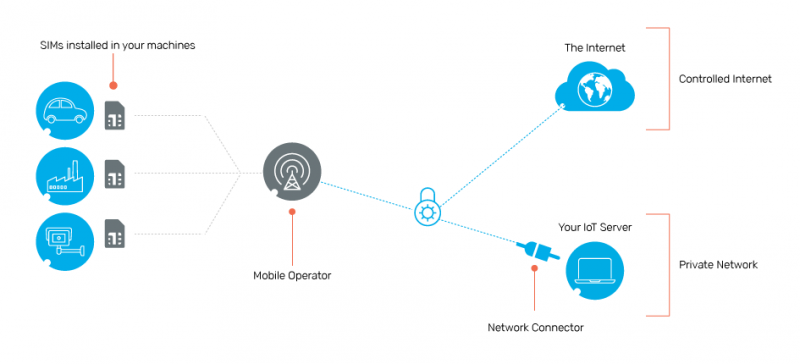
You will have visibility into the status of your connected devices/machines and the control to change regions and data limits for the devices to keep your costs under control.
How does it Work?
The service allows you to use a private APN and create your own secure network between your devices and any chosen destination host. Devices set up on a network can securely connect to an internet destination and/or have a static private IP address with bidirectional communication to the host/Local Area Network (LAN).
What is a Private APN?
An Access Point Name is the name of a gateway between your mobile device and the Internet. A mobile device requires an APN in order to access the Internet.
A private APN is a service that will connect mobile devices into one private network to enable secure communication and the ability to use company’s applications and data whenever needed.
It is private because it protects your data and identity from public networks such as the Internet and wireless hotspots.
What are the Advantages of a Private APN?
Traffic is secure as devices are authenticated before accessing the network. This provides a greater level of flexibility and control to organizations looking to access advanced data services. It also provides easier and convenient integration with different backend systems.
Cloud Connector:
Why some Devices are not Listed in the Cloud Connector Group?
Devices are added to the Cloud Connector Group when they are first activated (i.e. the devices are in Live/Enabled state). Before that, the device will not be listed in the group.
If you are using the APIs, it could be because you have removed the device from a Group and/or moved it to a different group. You can check using the API which devices belong to a Group and move it back to the desired Group.
Are my Cloud IAM keys Stored?
The provisioning process requires an IAM user (AWS IoT Core) or a shared access policy (Azure IoT Hub) to provision the devices to your cloud account.
These keys are requested each time the provisioning is triggered and are never stored in the service.
Once the provisioning of all devices has been completed, it is recommended to revoke or delete the keys.
See here for more information.
How do I Setup a Cloud Connector Endpoint?
To set up the endpoint from the portal you can:
- Follow the Quick Start Guide
and - Check the API guide.
What is the Cloud Connector?
Cloud Services Connector is a secure cloud gateway for the devices running inside your private network that need to connect to IoT services in the public cloud.
It automates the identity, certificate creation, and management, linking the device/SIM identity with the unique cloud credentials and includes a proxy that will forward traffic from these devices to the public cloud IoT service of choice.
See here for more information.
Ordering SIMs:
How can I buy more Data?
If you need more data for your account, please contact your sales agent.
When does my Billing Cycle date Start?
Your monthly billing charges will be calculated on the 1st of each month or are dependent on your signed contract date.
Where can I Order SIM Cards to Install in my Devices/Machines?
If you want to buy more SIMs please contact your Account Manager.
Where can I find my Account Login Details?
- The login details are in the confirmation email received when your account was created.
- Check your email spam folder to see if the email was marked as spam by your mail server. If so, please add our domain to you whitelist so that you receive future emails from us.
Network Setup and Management:
Can I Restrict the Bit Rate per Device?
Yes, from the Advanced Network Settings page, you can define the maximum bit rate that is applied per device. Please note:
- Bit rate limit is enforced per second
- Bursts are allowed where the maximum burst size is always set to double the value of the bit rate limit (e.g. if the bit rate limit is 100 kbps the max burst size is 200 kb).
When this rate limit is configured, two parameters are set, the bit rate and burst (always double the value to the burst parameter). Short momentary bursts above bit rate will be allowed.
When a device is connected, every second, bit rate value is added to a token bucket up to a maximum of the burst value, as traffic is passing through tokens are used up from this bucket
Burst value is, therefore, the maximum amount of tokens that a device can accumulate when it is not sending any traffic. For example, if a device is not sending any traffic, it will accumulate up to burst amount of tokens and then when it starts sending data, it can use them all up, in a burst, but then if it keeps sending traffic, then it will settle at the bit rate limit.
I have set up my Network, what Should I do Next?
- If your topology consists of:
- A Private Network (VPN) then you will have to install your Network Connector.
For more details see How to Setup and Install Your Network Connector?. - An MQTT cloud connector then you will have to set up a cloud connector endpoint.
For more details see How do I set up an MQTT Cloud Connector endpoint?.
- A Private Network (VPN) then you will have to install your Network Connector.
- Set up and connect your first device, to verify that everything is working properly.
For more details see How do I connect a device to the network?.
How do I set up my Network?
When you first log in to your account using the link provided in the confirmation email, you will be prompted to set up your network and download the Network Connector installer.
The following settings apply to all the devices:
- Name: For network identity to contain at least 5 characters.
- Region: Depending on where your account is based and the devices you are using, it normally defaults to the US and/or Europe.Note: Some carriers like Verizon do not support this capability.
- Data Usage Limits: When each device reaches its limit, you will receive :
- Warning Limit: An email notification
- Cut-off limit: Another email notification and the device will be unable to connect.
How do I Connect a Device to the Network?
You can connect a device to the network following these steps:
- From the devices list, go to the device details of the specific SIM you will use in your device.
- Activate your device if not already active from the status drop-down at the top of this page.
- Insert the SIM in the device.
- Set up the APN on the device referencing your device documentation on how to do this.
You will find the APN configuration details (APN, user and password) for the SIM in the device details page. - Connect the device to the cellular network.
- Verify that the device is connected by checking the Connected status in the device details page or in the devices list for each device.
Note: If you hover over the Connected icon you can refresh the status. - Once connected, if your device supports it and you can access the device, ping 10.192.0.0 to confirm that the device is properly set up.
- As an additional test, with your Network Connector already installed, ping the IP address of the device (you will find the device IP address in the devices details page and in the devices list) from the host of your Network Connector.
Congratulations you are done!
If you were not able to complete the steps please email support@asavie.com.
Should I Always Define a Data Usage Limit for my Network?
Your data usage limit will be linked to your bundle and you will need to contact your sales agent to change this.
Where can I use my Connected SIMs?
Check the network settings in your account to see the list of regions where your devices will work. It will be different for each carrier.
How much data are my Devices Likely to Use?
Data usage is counted in KB (kilo-byte) and totaled across the entire account at the end of your billing cycle. The total data usage for all subscriptions is then charged at the appropriate price for that data volume band. MB (megabyte), GB (Giga-byte) and TB (Tera-byte) figures are based on a 1024 multiplier.
Because machines have a different connectivity usage than mobile phones, and with the variety of IoT projects that people are engaged in, it is difficult to say how much data you are likely to use. \
As a guideline: 1 SMS (text message) exchange in Ireland is .33KB (less than 1c each).
IoT CONNECT calculates the percentage of data usage per device in relation to the cut-off point that you have set on your network. If you have no cut-off point set, you will still be able to see how much data your devices are using. You can check these levels at any time by logging into your account and viewing the device list. The average numbers of the home page will help you with this.
Customers IoT projects vary in size and complexity so it is difficult to say how much data you are likely to use. Please see the following examples to guide you in selecting your data usage limits:
- Low
If your IoT project involves reading a sensor every hour on a one-way communication e.g. temperature reading from a refrigerated truck, you might use around 1MB a month.
If you need a more frequent 2-way communication every 30 seconds e.g. the speed of a pump or motor, you could use 5 – 10 MB a month. - Medium
If your IoT project involves sending and/or receiving rich text files you will use much more data than the binary data used in the above examples.
For instance, a word document with the word “hello” sent one direction 10 times a day would use around 16KB working out at around 5MB a month. An image, such as a photo of a car from a speed camera, is a much larger file size and would use up much more per month. - High
Video or voice data will bring your usage into the top tier and you should allow between 100 and 500MB or more per month for this type of data.
Please keep in mind that these just reference estimations and your project might be vastly different from these scenarios.
Will I be Alerted when my Devices use too much Data?
IoT CONNECT allows you to set up two types of data control alerts on your network:
- When a device has used a set amount of data in a month
- One that will cut off a device if it reaches a set amount of data usage in a month
These alerts will show up on your account and you have the option of receiving an email about them. We send alerts by email unless you specifically turn this off.
Both alerts are optional, but we encourage you to set them as a way of controlling your costs. If you are concerned about cutting off devices in the field, you can set the cut-off point to a very high value or you have the option of never cutting off.
.
You will be prompted to set these when you first set up your network, but you can change these at any time by:
- Logging into your account
- Select Network Settings
- Click Edit Networks Setting icon

- Make changes and click Save.
What is the Network IP Address and Subnet Mask?
The Network IP (Internet Protocol) is a unique address for your Private Network.
In general, our suggested settings should work fine with most common network configurations. However, if your devices and network connector have to communicate with your existing Local Area Network (LAN) there is a risk of another node in the network having an IP address within the suggested range. In this case, you will need to select a custom IP address range for your network, if you are unsure check with your IT administrator.
The Subnet Mask defines the IP address range for your network so that your devices are each assigned a private IP address within that range. This is required by our system to identify a SIM communication.
For example, An IP Address: 192.168.0.1 with a Subnet Mask: 255.255.255.0 will give you a range between 192.168.0.1 and 192.168.0.254. That will give you up to 254 addresses which means you can have up to 254 SIMs running on the network.
When defining this range keep in mind the LAN (Local Area Network) IP addresses in use in order to avoid issues. Check this with the IT administrator of your LAN if you need more help.
In general, our suggested settings should work fine with most common network configurations. However, if your devices and network connector have to communicate with your existing Local Area Network (LAN) there is a risk of another node in the network having an IP address within the suggested range. In this case, you will need to select a custom IP address range for your network, if you are unsure check with your IT administrator.
Why Should I use the Suggested IP Settings?
In general, our suggested settings should work fine with most common network configurations. However, if your devices and network connector have to communicate with your existing Local Area Network (LAN) there is a risk of another node in the network having an IP address within the suggested range. In this case, you will need to select a custom IP address range for your network, if you are unsure check with your IT administrator.
Security:
Can I Restrict the Bit Rate per Device?
Yes, from the Advanced Network Settings page, you can define the maximum bit rate that is applied per device. Please note:
- Bit rate limit is enforced per second
- Bursts are allowed where the maximum burst size is always set to double the value of the bit rate limit (e.g. if the bit rate limit is 100 kbps the max burst size is 200 kb).
When this rate limit is configured, two parameters are set, the bit rate and burst (always double the value to the burst parameter). Short momentary bursts above bit rate will be allowed.
When a device is connected, every second, bit rate value is added to a token bucket up to a maximum of the burst value, as traffic is passing through tokens are used up from this bucket
Burst value is, therefore, the maximum amount of tokens that a device can accumulate when it is not sending any traffic. For example, if a device is not sending any traffic, it will accumulate up to burst amount of tokens and then when it starts sending data, it can use them all up, in a burst, but then if it keeps sending traffic, then it will settle at the bit rate limit.
Can I Allow my SIM to Connect from Only one Specific Device?
Yes, you can lock your SIM to the IMEI of a device. The IMEI (International Mobile Equipment Identity) is an identifier of the cellular modem of your device. You can enable the device lock from the user interface for each SIM.
Once the lock is enabled:
- The user interface device lock for that specific SIM will show as “Waiting”
- The IMEI will be captured in the next connection made by the device.
- The captured IMEI will be bound to the SIM, so any further connection using a different IMEI will be rejected
- The IMEI will be shown in the user interface.
Note:
- The locking mechanism relies on the IMEI being sent when the device tries to connect to the cellular network. Sometimes it is not sent, and if the lock is enabled and the IMEI has already been captured the connection would also be rejected, even if the connection is from the right device
- The IMEI identifies the cellular modem, not the device. A device can have more than one cellular modem. If a device has more than 1 SIM slot and all SIMs can be active at the same time then it has multiple cellular modems. In this scenario, the device won’t be able to connect when a SIM that is locked is moved to another SIM slot.
Are Changes in the Domain Name Whitelist Applied in Real Time?
The new policy is applied in real time. However, the devices could be caching the IP addresses of the domain names for some time, usually until they expire. This might vary between domain names and between devices. The change in the policy won’t take effect until there is a new DNS request from the device.
In this situation we recommend you clear the DNS cache of your device. How to do that depends on the type of device but can usually be achieved by disconnecting and reconnecting to the network or by rebooting the device.
I have Defined a Domain Name list and I am Browsing the Internet but I Cannot Access to sites in my White list. What is the Problem?
You must be aware that certain websites could be doing redirections to different domains based on your location or loading resources from different subdomains. Your whitelist should include every URL that is required.
E.g. if the whitelist includes www.acme.com but the page requires resources from cdn.acme.com or it is forwarded to www.acme.ie then the web page won’t load properly.
This scenario is more unlikely to happen in IoT use cases where the destination is the URL of an API for e.g. MQTT traffic or device management platform.
How does Domain Name Filtering Work?
If the list of Domain Names is empty, then the SIMs will be able to resolve any DNS. However, if there is at least one element in the list it will behave as a whitelist, allowing the client devices to resolve the IP address only for domain names that match any of the entries in the list.
For each entry in the list, you can define whether it includes subdomains or not.
- If an entry does not include subdomains, then the devices will be able to resolve a domain name only if it matches exactly the content of the entry i.e. “domain1.acme.com” would not match “domain2.acme.com”, “subdomain.domain1.acme.com” or “acme.com”
- If an entry includes subdomains, then the devices will be able to resolve that domain and any subdomain of that entry.
Some examples here:
| Entry | Includes Subdomains | Allows | Does Not Allow |
| acme.com | NO | acme.com
|
acme.ie
label1.acme.com label2.acme.com subdomain. label1.acme.com |
| acme.com | YES | acme.com
label1.acme.com label2.acme.com subdomain. label1.acme.com |
acme.ie |
| label1.acme.com | NO | label1.acme.com
|
acme.ie
acme.com label2.acme.com subdomain. label1.acme.com |
| label1.acme.com | YES | label1.acme.com
subdomain. label1.acme.com
|
acme.ie
acme.com label2.acme.com
|
How can I setup Network ACLs for my network?
- Log in to your account.
- Click:
- Network Settings
- Advance Network Settings
- In the Network Access menu, you can add/modify/remove ACLs with the following information:
-
- Order: Order in which the rules are applied where a lower value means a higher priority
- Direction: Specify whether the rule is applied to traffic from the devices or to the devices
- Type: Select from a list of predefined options. This includes a list of predefined services (e.g. HTTP) which involves a combination of specific protocol and port, or generic options that will let you customize the protocol and port or range of ports. If your service is not on the list, you can choose Custom protocol
- Protocol: IP protocol to be applied. It includes TCP, UDP, and other IP networking protocols
- Source: Depending on the Direction selected previously, the Source can be the SIMs (if Direction is “From Devices”) or a custom network IP subnet specified in CIDR format (if Direction is “To Devices”) e.g. 192.168.0.0/24
- Destination: As with the Source, depending on the Direction selected previously, the Destination can be the custom network IP in CIDR format (if Direction is “From Devices”) or the SIMs (if Direction is “To Devices”)
- Port range: Port (e.g. 80 for HTTP) or range of ports to be applied
- Access: Traffic that matches the ACL should be permitted or denied
- Enabled: If the rule is not enabled it is not applied to the traffic.
Note:
-
- If the list of ACLs is empty, then all traffic is allowed
- If there is at least one Network ACL then all the traffic that is not explicitly allowed will be denied.
For example, to restrict the traffic in an internet & VPN network so that:
-
- Devices can only talk HTTPs to the internet
- There is remote access to the devices using ssh protocol for management purposes (we’ll assume that they will be accessed from agents in the 192.168.0.0/24 LAN)
- All other traffic is not allowed.
The Network Access Rules list would look like:
| Type | Protocol | Direction | Source | Port(s) | Destination | Port(s) | Access | Enabled |
| HTTPS | TCP | From Devices | SIMs | any | 0.0.0.0 | 443 | Permit | Yes |
| SSH | TCP | To Devices | 192.168.0.0/24 | any | SIMs | any | Permit | Yes |
| All Traffic | any | any | any | any | any | any | Deny |
How can I Restrict Traffic on my Device?
You can restrict the traffic using any of these 2 mechanisms (or both):
- Network IP ACLs (Access Control Lists), allowing you to restrict the destination IP and IP protocol your SIMs can reach
- Internet rules or Domain Name filtering, i.e. a whitelist of Domain Names your devices will be able to resolve.
Remote Power-Cycling
It is highly recommended that you have a remote mechanism to reboot, or power cycle, your equipment in the field. Unforeseen or low probability events can be difficult to bench-test for. It is generally good practice to have some mechanism to turn it off and back on again and having a planned remote way to do this can save time and effort of having to physically travel to the site. Many hardware vendors will include a scheduled reboot option in their firmware. Some hardware vendors also include SMS as a channel to reset equipment outside the primary IP link.
Session Timeout
Mobile networks are a shared resource, therefore, limits are set to ensure no single connection can hog the shared infrastructure. Data sessions which have been established for 24 hours will be disconnected. Please ensure that your software/hardware solution can handle this type of timeout/disconnection and re-establish a connection when required.
SIM Management:
Why MCC/MNC Displays “Unknown” in the Last Connected Field for a SIM or Sessions Report?
The MCC and MNC values from the roaming mobile network are sent as part of the initial authentication request when a device wants to connect. However, they are optional parameters and are not always part of the connection request information. In these scenarios, the UI will show “Unknown” both for the MCC and MNC information.
What do I do if a Device has used too much Data?
You can suspend a device card via your account if you need to check out an issue with it running up data costs. If you can resolve the issue, move the device back to Live so that it can continue working.
Can I Change the Region for a Device?
Yes, you can change the region for individual devices. To change the region for a device:
- Log in to your account.
- Click:
- Devices
- The device in the list, or search using the Filter List
- The change region drop-down menu and select the new region
- Confirm to make the change or Cancel to retain the current status.
Note: Devices will automatically be enabled for the region defined on the network unless you have changed this for a device or devices.
Can I Change the Region for Multiple Devices?
You can change the region for multiple devices after your network has been set up:
- Log in to your account.
- Click:
- Devices
- Device or Multiple devices on the filter list
- The change region drop-down menu and select the new region
- Confirm to make the change or Cancel to retain the current status.
Note: devices will automatically be enabled for the region defined on the network unless you have changed this for a device or devices.
What does the Device Life Cycle Status tell Me?
State of a device indicates whether or not that device is capable of actively using data.
- Available: devices are provisioned in the account ready to be enabled
- Enable: devices that are up-and-running, sending and/or receiving data.
- Disable: devices will not send or receive data while in this state.
You may move devices to this status if they have issues or are problematic.
How can I Change the Status of a Device or Multiple Devices?
- Log in to your account.
- Click:
- Devices
- Device or Multiple devices on the filter list
- The change status drop-down menu at the top right and select the new status
- Confirm to make the change or Cancel to retain the current status.
What to do if a SIM or Device is lost or Stolen?
You can disable a device via your account if it has a problem:
- Log in to your account
- Click:
- Devices
- The lost or stolen device in the list, or search using the Filter List located at the top right
- The status drop-down menu at the top right and select Disable
- Confirm to make the change or Cancel to retain the current status.
What is ICCID?
ICCID (Integrated Circuit Card Identifier) identifies each SIM internationally. It is 19 or 20 characters, inscribed on the back of the SIM Card. It can be thought of as the serial number of the SIM Card and will help you physically identify the SIM cards you are managing.
What is the MCC/MNC?
Mobile Country Codes (MCC) in combination with Mobile Network Code (MNC) is used in wireless telephone networks (GSM, CDMA, UMTS, etc.) in order to uniquely identify a mobile operator (carrier) using GSM, UMTS, LTE and sometimes CDMA mobile networks.
This MCC/MNC tuple is used then to identify the provider of a SIM card and is also used to identify the mobile network a device is connecting to in roaming scenarios. In the user interface it is utilized to identify the mobile operator for the last connection of each SIM and for each connection in the session reports.
Can I Create my own Reports for Device Activity?
You can download the complete device list from the SIM list page in CSV (comma separated file) which can be opened in Excel or any reporting tool that supports CSV:
- Log in to your account
- Click:
- Devices
- The Download icon
 located to the top right.
Note: This will initiate the download for all devices, we cannot download for individual devices.
Network Connector Installation:
What type of VPN Tunnel is the Network Connector Establishing?
The Network Connector initiates an IP over TLS connection (TLS1.2), to specific service IP addresses on port 443 with the following spec:
- Authentication: RSA 2048/SHA256 certificates
- Cipher suites supported:
- TLS_ECDHE_RSA_WITH_AES_128_GCM_SHA256_P256
- TLS_ECDHE_RSA_WITH_AES_128_CBC_SHA256_P256
- TLS_ECDHE_RSA_WITH_AES_128_CBC_SHA_P256
- TLS_RSA_WITH_AES_128_GCM_SHA256
- TLS_RSA_WITH_AES_128_CBC_SHA256
- TLS_RSA_WITH_AES_128_CBC_SHA
- TLS_ECDHE_RSA_WITH_AES_256_GCM_SHA384_P256
- TLS_ECDHE_RSA_WITH_AES_256_CBC_SHA384_P256
- TLS_ECDHE_RSA_WITH_AES_256_CBC_SHA_P256
- TLS_RSA_WITH_AES_256_GCM_SHA384
- TLS_RSA_WITH_AES_256_CBC_SHA256
- TLS_RSA_WITH_AES_256_CBC_SHA
- TLS_ECDHE_RSA_WITH_3DES_EDE_CBC_SHA_P256
- TLS_RSA_WITH_3DES_EDE_CBC_SHA.
Note:
- The service will choose the cipher suites based on what the Network Connector offers, which depends on the OS version
- The minimum OS version for the Network Connector when using Windows is Windows Server 2010 or Windows 8.1
- For example, if a customer is using one of these 2 operating systems with a default configuration, the cipher suite to be used would be TLS_ECDHE_RSA_WITH_AES_256_CBC_SHA384_P256
- For other scenarios, the suite could be different depending on OS capabilities.
How can Add/Modify Routes and Metrics for my Private Network?
- Log in to your account.
- Click:
- Network Settings
- Advance Network Settings.
- In the Routing Information menu, you can add/modify/remove routes, with the following information:
- Subnet and mask of the destination
- Metric, or link cost
- Next hop: this is the next closest/most optimal router for the IP traffic. It must be the IP address of one of your Network Connectors.
- Click Confirm to make the change or Cancel to retain the current status.
How can I Connect to Multiple Private Clouds?
You can reach different private destinations by installing one Network Connector in each of them.
Once the Network Connectors are installed you will need to modify the routing rules for your network to route traffic appropriately to each cloud’s subnet IP range.
How can I Configure my Network for High Availability?
The service supports multiple Network Connectors and complex routing rules with link-cost/metrics that allow high availability scenarios to be supported. Below are some guidelines for the setup. For further details contact support.
You can achieve high availability in your VPN network by installing 2 or more network connectors in different hosts of your network.
Once you have installed them you can have either load-balanced or primary-secondary (failover) scenario. The only difference is the metric (i.e. link cost) associated with the corresponding routes:
- For load balancing the metric for all routes, each network connector must have the same value
- For failover, you’ll have to set up a lower value for your primary network connector and a higher value for the other(s).
You can modify the metric in the routing table available in the advance network settings menu.
Note: Please be aware that high availability requires an appropriate network topology and routing configuration also in your LAN. If you don’t know how to do this, please contact your IT administrator.
Can I Install my Network Connector in AWS?
To deploy your Network Connector in your AWS account you need:
Pre-requisites
- Your own VPC
- Internet GW. The network connector will establish an outbound TLS connection where outbound traffic on ports 80 and 443 must be allowed
- Host instance with the appropriate OS (Linux or Windows). We recommend you:
- Instance type/size: t2.medium or higher
- For Windows OS:
- Windows Server 2016 but other versions will work (see Network Connector requirements)
- List of Windows AMIs: https://aws.amazon.com/windows/resources/amis/
- For Linux OS:
- The agent is supported on 64-bit platforms only, and is available in 2 variants:
- *.rpm
This generic RPM package is intended to support recent Enterprise Linux 7 based distros and newer.
For example:- CentOS 7.0 and newer
- Fedora 19+
- RedHat Enterprise Linux 7.x and newer.
- *.deb
This generic DEB package is intended to support recent 64-bit Debian-based distros, in particular:- Ubuntu 15.04 and newer
- Debian 8.0 (Jessie) and newer.
Note: Asavie has not explicitly tested on all relevant distros. Testing so far for the *.rpm package has concentrated on CentOS 7 (Core) while for* .deb testing has concentrated on Ubuntu 16.04.3 LTS.
- *.rpm
- The agent is supported on 64-bit platforms only, and is available in 2 variants:
-
-
- List of Linux AMIs: here
-
- We recommend you also to set up a Security Group restricting inbound access from source IP of your office or the environment from where you’ll be managing your VPC via e.g. Remote Desktop.
Once your environment is ready you will need to:
- Install the Network Connector
- Access to your Windows host through RDP
- Download the Network Connector Installer by copying the file through Remote Desktop or if you open your IoT Connect account from a browser in your Windows instance and download it form your account
- Run the installer and follow the steps (it will ask you for the activation code).
- Setup the routing table with an entry for the subnet of your SIMs, which is set to the Network Interface of the Network Connector. This can be completed with the following CLI command:
aws ec2 create-route –route-table-id [route id] –destination-cidr-block [IP range of your SIMs] –gateway-id [id of the network interface created by the Network Connector].
More info here: http://docs.aws.amazon.com/cli/latest/reference/ec2/create-route.html - Disable Source and Destination checking which can be completed with the following CLI command:
aws ec2 modify-instance-attribute –instance-id [id of your instance] –source-dest-check “{\”Value\”: false}.
More info here: http://docs.aws.amazon.com/cli/latest/reference/ec2/modify-instance-attribute.html
…
What are the requirements for the Network Connector?
- The Network Connector should be installed on a server that meets these criteria:
- Is “always-on” (i.e. not a desktop or laptop)
- Runs Windows or Linux (see Minimum OS versions below)
- Has Internet access (see Network requirements below))
- Either hosts (or has network connectivity to) the services and applications your IoT devices need to connect to.
- Minimum OS versions
- Windows
- Windows Server 2012
- Windows 8.1
Notes:- Recommendation is to use the latest Windows Server 2016 when available.
- Network Connector should function normally on earlier versions of Windows (e.g. Server 2008, Windows 7 and even earlier), but no official support is offered for these now-obsolete Windows platform versions.
- Windows
-
- Linux (64-bit platforms only)
- Enterprise Linux 7 based distros:
- CentOS 7.0 and newer
- Fedora 19+
- RedHat Enterprise Linux 7.x and newer
- Debian based distros:
- Ubuntu 16.04 and newer. NOTE: Ubuntu 20.04 currently not supported
- Debian 8.0 (Jessie) and newer
- Enterprise Linux 7 based distros:
- Linux (64-bit platforms only)
Note: As a good practice, the latest OS updates should always be installed for security and compatibility reasons.
- Network requirements
- In order to be able to connect to the devices and establish a secure VPN, the server or computer must be able to reach the internet (outbound connections to both port 80 and 443)
- If you need DNS in your private network, the server or computer must have access to your DNS server (usually on port 53 both TCP and UDP)
- The network connector might conflict with other VPN applications installed on the same host, even if not enabled at the same time.
- Physical requirements
We recommend that the physical machine or VM the network connector is installed and has access to 4GB of RAM. The CPU and network requirements will vary depending on the customer. If a connector is running on a VM, the physical machine the VM is on needs to have enough resources to provide the connector with what it needs. If there are multiple VMs on a physical machine, the physical machine must have the processing power, RAM, and network capabilities to support the connector VM at peak usage.
As a reference, we recommend an AWS instance type of t2.medium as specified here: https://aws.amazon.com/ec2/instance-types/
Other notes
In general, it is recommended that a Windows Server instance (e.g. Server 2012) is used over a client OS (e.g. Windows 10).
What is the Network Connector?
- The Network Connector is one end of the secure tunnel that will be established to connect your SIMs to your Private Network.
- The Network Connector is NAT-friendly, fully integrated with Windows, providing a VPN Virtual Interface adapter, advanced automatic routing controls, and seamless DNS integration.
- The Network Connector initiates an IP over TLS connection (TLS1.2) to a specific IP address on port 443.
How is DNS Resolved for my Network?
Your client devices are always assigned a DNS server IP when they connect to the cellular network.
Which DNS server and how it behaves depends on the type of network you have:
| DNS Server | |
| VPN | Network Connector |
| Secure Internet | IoT Connect DNS Resolver |
| Hybrid (VPN and Secure Internet) | IoT Connect DNS Resolver or Network Connector (can be configured as part of Network Settings)
Default is IoT Connect DNS Resolver |
Network Connector: when using the Network Connector, the DNS requests from your devices are forwarded to your Network Connector that acts as a DNS proxy for remote clients.
Your Network Connector will use the DNS server configured on the host/server where it is installed to resolve DNS requests from the client devices.
Network Connector will allow your devices to resolve any DNS lookup both for private or for public domain names (assuming the Network Connector host can resolve them).
IoT Connect DNS Resolver: the service provides a secure dedicated internet resolver for the devices inside your network that can resolve all public DNS lookups. IoT Connect DNS Resolver is highly available and secure, accessible only inside the network and allowing only responses from external authoritative DNS servers fully validated using DNSSEC.
IoT Connect DNS Resolver will allow your devices to resolve any DNS lookup for public domain names but not for private DNS queries. Therefore, if you use your own private DNS and need your devices to resolve private DNS queries you will have to configure the Network Connector.
How is DNS Resolved for my Private Network?
Your network connector acts as DNS proxy for remote clients. The DNS server used is the DNS server configured on the Network Connector host (i.e. the server where your Network Connector is installed). The hosts file on the Network Connector host is also used to resolve addresses for remote clients.
How to Setup and Install Your Network Connector?
To install your Network Connector first you will need to identify a suitable Host Server (see Network Connector Requirements).
Once identified, it is recommended that you start this process from a browser session on the server. If this is not possible, you will need to copy installer files to the server as part of the process.
Then there are 2 phases:
- Setup: In this phase, the Network Connector is created with a friendly name and an IP address for the virtual adapter, that will become part of your private network
- Installation: In this phase, the Network Connectors will be installed, authenticated and securely connected to your private network. These steps are specific to the OS of the server.
- Network Connector Setup
- Log in to your account, go to Network Settings and click on the Add New button beside Network Connectors.
- Give a friendly name to your Network Connector. This is mainly for you to be able to easily identify each connector when you have more than one.
- Assign an IP address (or accept the suggested value).
Note: The IP address must not conflict with any internal IP range on your server or with the private range used by your SIMs. - Continue and select the appropriate OS (Windows or Linux):
- For Windows, select the appropriate platform (32 or 64 bits)
- For Linux, select the distribution (RedHat or Debian family)
- Download the installer (you will have to copy the installer to your server if you are browsing the portal from a different computer).
- Copy the activation code provided by the user interface
- Complete the installation (see below).
- Windows Installation
The installation on Windows is with a standard MSI Windows installer.
- Run the installer in your server.
- When prompted for the activation code, paste it and click next.
- Complete the installation.
Your Network Connector will be started, and the tunnel will be connected.
- RPM package Installation
For CentOS, Fedora, RHEL and similar distros.
The Network Connector gets installed as a service (daemon), managed by the system.
Additionally, a command line utility is installed to allow for querying the status.- From the command line type the following to install the package:
> sudo yum install -y asavie-vpnagent-0-xxxxxxx.x86_64.rpm - Start the service with systemd:
> sudo systemctl start asavie-vpnagent - Activate the Network Connector using the activation code obtained previously:
> sudo asavie-vpn enroll <activation-code>
- From the command line type the following to install the package:
Once activated, the Network Connector should automatically stay connected.
- You can check the status using the command-line status tool:
> sudo asavie-vpn status
- DEB package Installation
For Ubuntu, Debian, and similar distros:
The Network Connector gets installed as a service (daemon), managed by the system.
Additionally, a command line utility is installed to allow for querying the status.
- From the command line type the following to install the package:
> sudo dpkg -i asavie-vpnagent-0-xxxxxxx.amd64.deb - Start the service with systemd:
> sudo systemctl start asavie-vpnagent - Activate the Network Connector using the activation code obtained previously:
> sudo asavie-vpn enroll <activation-code>
Once activated, the Network Connector should automatically stay connected.
- You can check the status using the command-line status tool:
> sudo asavie-vpn status
My Download Failed, what Should I Do?
Make sure you have internet access available and the right permissions to download and run the installer (The name could vary depending on the date/version).
How can I Restart a Network Connector?
You might need to restart it if the network is down or after you enable a connector from the web interface.
You can check the status and restart it by opening the network connector admin interface from the notification icon in Windows taskbar (usually the bottom right corner of the screen) and clicking on the restart button (or stop & then start if a restart is not available).
Note: The connector must be enabled before you start it
How do I know if my Windows Operating System is 32 or 64-bit?
To view the system type:
- Open a File Explorer window by pressing Windows Key + E.
- On the left, right-click This PC.
- In the context menu, select Properties.
Note: The System Properties window opens. - In the System Properties window, locate your System type, which lists your operating system and CPU type.
Why do I need a Separate IP address for my Network Connector?
This must be a unique address so that our system knows which address to send the communications from your devices. It cannot be within the range of your Network (i.e. the IP addresses assigned to each device.)
We suggest an IP address based on the range you have set up for your Network and this should work fine for any project as long as there is nothing else running on the system that is already using the same IP as we have suggested.
Can I have more than one Network Connector (VPN) on my Account?
You can set up multiple network connectors. For instance, you might want to set one up on a testing server before deploying it to the live server. In this case, you would need to disable the test one when you want to move to the live one.
If you want to use multiple connectors at the same time for High Availability or to connect to multiple clouds you will need to set up the appropriate routes in the advance network settings. Please read the following FAQs for more details.
Troubleshooting:
Why can’t I Activate and Start my Network Connector?
Note: This issue affects Windows Server 2008 and Windows 7. Extended support by Microsoft for both versions ended in January 2020. Please upgrade to the latest OS version. Minimum OS versions for the Network Connector are Windows Server 2012 and Windows 8.1
To support the SHA256 code signing certificate on our driver, Server 2008 R2 and Windows 7 SP1 require Windows Security Update KB3033929. This update is installed automatically on any machine that has Windows Update switched on. However, where this update is not installed, the agent will not be able to establish a tunnel connection. If this is the case, a customer can install it by updating the computer to the latest version of Windows or by downloading the specific update here:
https://www.microsoft.com/en-us/download/details.aspx?id=46148
A machine that is not up to date with the latest Microsoft patches will display some or all of the following after an agent install:
- There will be a yellow warning triangle beside Device Manager -> Network adapters -> Asavie Network Virtual Adapter.
- The network adapter will install but there will be no adapter present under “Network Connections” in the control panel.
- On installation, there will be a warning about an untrusted or unknown publisher.
Newer operating systems are not affected.
Why is my Device not able to Connect?
This could be for a number of reasons:
How can I Change the IP Address for my Network?
Changing the IP address of a single device/machine is risky and can generate issues within the way the other devices communicate, so this is not possible from Asavie IoT Connect. It is only recommended in extreme circumstances, but if you really need to you can contact support
How will I know if my Network is down and what can I do to fix It?
If your network stops working please complete the following steps to fix it:
- Check your IoT Server is switched on and not displaying errors
- Check your IoT Server has internet access
- Check and refresh the network settings and re-establish connectivity:
- Log in to your account
- Click Network Settings
- Click the Actions icon
 for the enabled Network Connector
 - Click Renew Settings
- If problems persist restart the Network Connector from your IoT Server:
- Click the Network Connector icon in Windows taskbar (usually the bottom right corner of the screen)
- If the problem still exists, you may need to re-boot your IoT server.
If you need more help, please contact support.
Glossary:
DNS
DNS, which stands for domain name system. It translates Internet domain and host names to IP addresses and vice versa.
On the Internet, DNS automatically converts between the names we type in our Web browser address bar to the IP addresses of Web servers hosting those sites. Larger corporations also use DNS to manage their own company intranet.
MTU
Maximum Transmission Unit (MTU) of a communications protocol of a layer is the size (in bytes or octets) of the largest protocol data unit that the layer can pass onwards.
APN
An Access Point Name is the name of a gateway between your mobile device and the Internet. A mobile device requires an APN in order to access the Internet.
Private APN
A private APN is a service that will connect mobile devices into one private network to enable secure communication and the ability to use company’s applications and data whenever needed.
It is private because it protects your data and identity from public networks such as the Internet and wireless hotspots.
If you need more help, you can search our contact support or connect with our sales team.