Using the web interface, this guide shows you how to configure your account and devices to securely provision and connect your IoT devices to AWS IoT Core or Azure IoT Hub.
To learn more about the benefits, concepts and how it works check the Overview.
Prerequisites
Before you begin you need the following:
- SIM and data bundle available in the portal
- Administration rights to an active AWS or Azure account
- IAM User for the cloud IoT service:
- For AWS IoT Core:
- Create AWS IAM User with programmatic access
- Attach policy
AWSIoTConfigAccess - Take note of Access Key ID and Secret access key, referred to as
$CLOUD_ACCESS_KEY_IDand$CLOUD_SECRET_ACCESS_KEYbelow - More info https://docs.aws.amazon.com/IAM/latest/UserGuide/id_users_create.html.
- For Azure IoT Hub:
- Create a shared access policy with
registryReadWritepermissions - Take note of the access policy name referred to as
$CLOUD_ACCESS_KEY_IDand the primary key for the policy referred to as$CLOUD_SECRET_ACCESS_KEYbelow - More info https://docs.microsoft.com/en-us/azure/iot-hub/iot-hub-devguide-security.
- Create a shared access policy with
- For AWS IoT Core:
- A cellular-enabled device with the ability to send MQTT messages
- Network topology set up for MQTT cloud connectors.
Note: The IAM User Access key ID and Secret access key are not stored in the service. A security best practice is to delete the cloud IAM user credentials after provisioning.
Configure your Cloud IoT Account
Configure and take note of your cloud IoT endpoint.
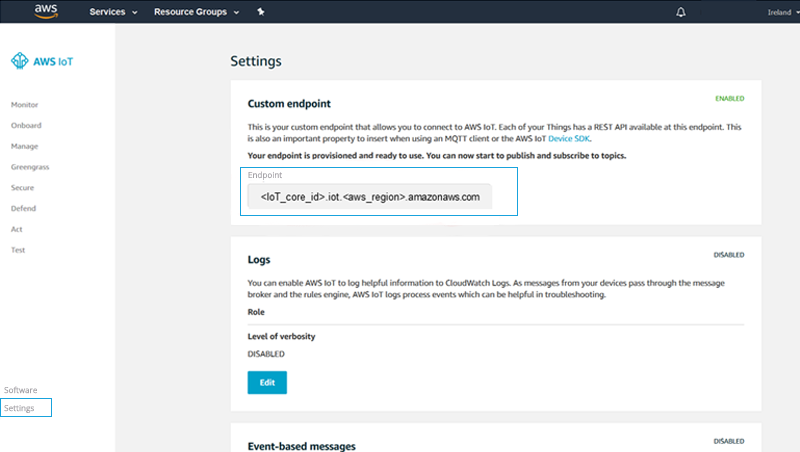
AWS
Browse to the AWS IoT service and select Settings noting the Endpoint, which looks like:
8aq34n5q8ffew.iot.eu-west-1.amazonaws.com.
Azure
Create an IoT Hub here: https://docs.microsoft.com/en-us/azure/iot-hub/quickstart-send-telemetry-node#create-an-iot-hub making note of the hostname, which looks like:
$YourIoTHubName.azure-devices.net
Configure the Cloud Connector Endpoint
Configure the Endpoint your devices will be connecting to:
- Select Cloud Connector>Endpoints>Create New Endpoint.
- Assign an Endpoint Name (no spaces or special characters allowed).
- Choose Endpoint Type:
AWS IoT Core or Azure IoT Hub. - Enter the Endpoint Host: this is available in the previous step “Configure your Cloud IoT Account”. This appears for:
AWS as an Endpoint and
Azure as a Hostname. - Click Save.
Notes:
- When an Endpoint is created, a Cloud Connector Group named default is also created.
All devices will be added to this group when they are first activated.
If a device is not in the group make sure it is activated in the portal with a live/enabled state. - You can modify the configuration of the endpoint at any time (e.g. if you need to move to a different account or cloud). In these scenarios, you need to repeat the provisioning steps below in order to re-provision the devices to the new cloud endpoint.
Provision the Devices
Provision the AWS IoT Core/Azure IoT Hub and associate the identities, certificates, and policies to each of the devices in the Cloud Connector Group.
Cloud provisioning steps require the cloud IAM User Access key ID $CLOUD_ACCESS_KEY_ID and Secret access key $CLOUD_SECRET_ACCESS_KEY.
The provisioning process will run a number of tasks for each device in the group:
For AWS IoT Core endpoints:
- In your AWS IoT Core account create:
- Key and a self-signed X.509 Certificate
- Thing
- Policy (only one policy for all devices) and attach it to the Certificate
- Attach the Certificate to the Thing
- In the Cloud Services Connector:
- Store the private key in the Vault, linked to the SIM identity.
For Azure IoT Hub endpoints:
- Create a key pair and a self-signed X.509 Certificate
- In your AWS IoT Core account create a:
- Device and link it to the Certificate thumbprint
- In the Cloud Services Connector:
- Store the private key in the Vault, linked to the SIM identity.
The provisioning process can be triggered:
- When you save the Endpoint for the first time, the portal will ask if you want to provision the devices.
- From the Cloud Connector Groups page, at any later point, using the provisioning action.
Note:
- This provisioning process may take some time, depending on the number of devices in the Cloud Connector Group.
- You can repeat the provisioning process at any time, and it will re-provision the devices. For example, you will have to re-provision if you change the endpoint configuration or add new devices to the Cloud Connector Group.
Validate the Configuration
You can check that the provisioning is complete in the :
- Portal:
Select Cloud Connector>Groups and click on the group for the list of devices.
For each device you will see:- Provisioned date
- Icon to download the certificate that has been generated for the device.
If a device is not provisioned make sure the SIM is activated and trigger the provisioning again.
- IoT Cloud account:
- AWS
Go to IoT Core service and you will see the Things, Group, Policy and Certificates created by the provisioning process.- Each Thing will have an id that corresponds to the SIM id of the device
- Each Certificate must be equal to the one that can be downloaded from the portal
- Group and Policy names are default.
- Azure
Go to your IoT Hub in the Azure portal and you will see the list of IoT devices created by the provisioning process.- Each Device will have an id that corresponds to the SIM id of the device.
- AWS
Congratulations, your devices are now ready to send MQTT data to your cloud IoT service!
You can send MQTT messages to the mqtt.asavie.network private endpoint which will be securely forwarded to your cloud IoT service.
For example, you can use Eclipse Mosquitto (https://mosquitto.org/download/) and publish a message using:
mosquitto_pub -d -h mqtt.asavie.network -p 1883 -t "test/topic" -m "Message to my topic" -V mqttv311
or if using TLS
mosquitto_pub -d -h mqtt.asavie.network -p 8883 -t "test/topic" -m "Message to my topic" -V mqttv311 --cafile DigiCertGlobalRootCA.pem
The message will be received in the corresponding topic of your cloud IoT service.
Security
Once the provisioning process has been completed, you should delete/revoke cloud IAM API keys.